


WHY I CHOSE THIS COSPLAY
From a physical standpoint the design of Alastor is WILD with those exaggerated shoulders, the crazy tiny waist and an A line coat. It is a very striking silhouette, and I do love tailoring. This design stretched my abilities, and pushed me to try some things I very rarely deal with in my sewing for real people and real figures. The wig is something I had never tried but is also not as gravity defying as some.
From a psychological standpoint (because I love characters that I wish to emulate or that have something I think I lack) I think we all want to be that confident in our abilities to take care of ourselves and do what needs to be done. I generally talk a big game but it hides a person that is generally unsure about the world, their place in it, why I do the things I do, and has general anxiety. I heard this idea once, I don’t know if I am saying it verbatim, but “self-confidence is the confidence in your body and mind to get a task done”. Self esteem is the belief that it is worth something or adds something to the human condition.
Alastor is very confident in the things that he believes in and acts upon them and that keeps him alive and thriving and that leads to his self confidence.

Design: How Did I Design This and Why I Designed It the Way It Is
This part really doesn’t exist in this build. The only thing I really wanted to redesign was the microphone cane. It is a wonderful idea but I wanted it to look more like a vintage microphone but other than that I wanted to make it as true to the concept art as possible.

This piece of concept art was invaluable.
While it is not the final product it gave me an extreme version of what the designer was thinking BUT the best part is the color swatches. You can totally make your own but it is just one more step I don't have to do. I also don't need to worry about how ambient light affects the color. I can't tell you how many times I have seen a person ask what color a fabric is and provide 2 images of the same character in different lighting .
Take The Look Apart
The Layers
When I design a cosplay with some historical aspects I do research on what the people of the time wear, this has a big influence on the shapes that are made by the garments and the way people move. This can be hard for more obscure times but the 1920s and 1930 are not that far away and there is a ton of research and ADVERTISEMENTS FROM THE TIME. These are invaluable to a costumer of any kind historical, or otherwise, they are not a modern persons interpretation or faulty research, cue the scene in a historical drama where the actresses are wearing corsets wrong and they will also tell you what the item is made out of.
Now thankfully Alastor has a strong dash of history so this should not be too hard
We will need to build
SHIRT - I would like it to have a leotard base so that it won't ride up as I move
It should have a band collar, this is what was traditionally worn under
detachable collars
PANTS- High waisted with suspenders, this will help keep the pants from
riding down and make a clean transition when worn with the coat
DETACHABLE COLLAR- Historically accurate but will help with
makeup clean up (only have to wash the collar not the whole shirt)
BOWTIE- make it attach with the collar
VEST- (?) Historically accurate but is it needed?
COAT- I mean he is his coat sooooo.....
WIG- There is little to no historical reference on this
STAFF- Let's look at microphones from the 1920 and 30’s
GLOVE - Make them high enough so they don’t fall
Might need a wrist slit to access hands

Shirt

I took my sloper and traced that out, because I didn’t need the whole thing but also I wanted to put pintucks in the shirt to give it more of a 1920s style shirt look. I also needed to know where the black cross shape was going. I slashed and spread the piece to accommodate the extra fabric ( image there) and once I sewed my tuck into place it was time to add the black cross shape to the front.
The shape is actually two sections, one that goes across my chest across the pintucks and one that goes down making an overlapping placket to hide the buttons. The collar is not the collar of the actual shirt you see, attached to the shirt there is a band collar that would have been common in the 1920s. The collar that you see is a separate piece called a detachable collar that buttons onto the shirt in the back and through the top most button (in this case this button also buttons into the Bowtie so the top most button is attached to an elastic to accommodate ALLLLLL the fabric). When I need to wash the shirt I just take off the collar and put it in the wash. The collar gets washed by hand and gets washed almost every time I wear it because of the makeup.
The sleeves are regular shirt style sleeves with cuffs and buttons but those are black so they blend in with the gloves if they are ever seen.
I like to put a crotch piece into the bottom of my shirt when they are under multiple layers of clothes. This allows me to move freely without worrying about my shirt coming untucked which would just destroy the illusion of being well put together.


Pants

The pants are just pants the only thing I really needed from them was they needed to be high waisted (sit at my waist) so there was no gap between where the coat ended and the pants began (this is a pet peeve of mine) I did that by adding suspenders and a cuff that was a different color then the pants but not the same color as the shirt ( there was a lot of variations of red if you could not tell) (pants fitting picture). I also needed suspenders to make sure while I was moving around the pants would not slide, keeping with the vintage them I added suspenders with buttons, this also gave a much more subtle profile
I did not over think the colored hem/ cuff on the pants, I cut a rectangle of the fabric I wanted and as big as the hem (plus a half inch) and twice as wide. I than folded it in half, hot dog. Then sew the short ends together making a circle and sewed it on the pant bottom. I do this a lot especially cuffs on short sleeves
Jacket
The wig and the coat are most definitely the hardest parts and the things that mean the most to the project. They are also tricky if you do not have a dress form even a duct tape one will do. Now I wanted the coat to be similar to turn of the century evening coats so the front is one piece with a little strip of fabric hanging down. This would also be able to hide seams more easily but before you can do any of that you need to make the lining and the shoulder pads

The lining in this needs to be pretty stiff but also light weight. In Al’s case the lining at the bottom is actually organza which helps the skirt of the coat maintain its own shape and hold itself up and out.
The lining fabric needs to be something heavy because that holds the shoulder pads… yhup in my Alastor build my shoulder pads are inside the lining of the coat this means having them between the lining and the outer fabric means that it stays in place better, as there is little to no room for the shoulder piece to move around. This also helps if I ever needed to take the shoulders out. It has a nice pocket for those shoulder pads to slip right into, but fingers crossed I will never have to because… it will be a pain to get them back in.

Alastor’s shoulders are foam and the edges are sanded down to a thin edge so you can not see it through the coat. I made a template of them and cut them out of 8mm EVA foam and sanded them for days, then I made a smaller pair that actually sits on my shoulders out of a thinner foam that is velcroed to the lining.

Paper template of the shoulder

8mm foam the shoulder on the left has been thinned down around the edges. The piece on the right has only been cut

Under the 8 mm foam I placed a piece that is 2 mm this is the part that actually sits on my shoulder and has the Velcro attached
This next step is another reason this cosplay is almost impossible without a dress form. YOU NEED to put the lining with the shoulders on a dress form and DRAPE THE OUTER LAYER. I don’t like draping and will avoid it at all cost but it is the only way to get the pattern piece for the front and back of the torso, otherwise the math gets really weird. I would also suggest making the shoulder section two parts. I mention this now because you will need to drape the shoulders with the sleeve in mind. Don’t try and carry the shoulder seam over the curve of the shoulder pad (that will make things look REALLY BOXY across the shoulders) or the sleeve up (making the arms look very high).
In my version there is a curved piece that sits between the sleeve and the shoulder, in the little overhang of the shoulder. You will also need to fit this piece while it is on you


This is a close up of the Velcro on the 2mm under shoulder. These piece of Velcro have corresponding Velcro on the lining facing out ward

if this piece is off you will not be able to lift your arms. I have been asked many times to make an Alastor coat for a client and without the client's ability to come in for fittings I have to say no because of this piece. (also most people are not prepared for the price point of a complex build like this).
Make a full muslin of this coat before moving on, make the sleeve muslin and attach it, make sure you can move your arms. Also add the lapels too, since they will be separate pieces because of the curve of the coat opening . Once this fits you can move on.
The outer layer of the coat is not so bad once you get the inner layers and the shoulders and arms squared away. The most annoying part was applying the stripes and shading, I wanted to apply the stripes as bias tape ( fabric) and I needed them to accentuate the shape of the coat so I needed them to go out at the shoulders, come in at the waist and back out at the coat hem and I wanted them to cover the darts I added to help with the shape. I basted a line to guide me later, basted the side seam and shoulders together and air brushed it to accentuate the shape even more and to make him more like the image we see when we first meet Alastor in Hazbin Hotel.

Once the air brushing was done I took the jacket apart again and sewed the strips on. It did take more time but those strips accentuated the shoulder to waist ratio so nicely I just can’t see using an already striped fabric.
Before putting together the coat like a regular coat I needed to interface some parts, the whole front and across the back of the coat was interfaced with fleece interfacing, this is to smooth out the transition from the foam to lining. On the skirt of the coat I interfaced that too, but with just a plain medium weight interface in black because of the sheer organza lining ( you will see this technique we will see again and again, it adds body to any fabrication just enough so it doesn't fold as easy and give you a full body horse hair look.). If I used a regular white interfacing you would see this light gray inside which for me would ruin the illusion.

This is also where I put in the nicks taking out of the hem. Some people will rip the fabric but I really don’t like the look of unfinished fabric and in this a cartoon where everything is so clean so it would just be jarring. So I snipped my cutout out if both the Organza lining and the wool and sewed them together simply bagging it out
Putting these pieces together with the interface might be hard and you might need to fight with it a little but it is totally worth it.
There is no real closure that can be seen in the show ( which is not uncommon) so I decided to leave room for a zipper, because if the pressure the coat is under I used a standard zipper, not an invisible one. Also to alleviate the strain on the zipper there is a 3 inch wide strip of elastic that runs from one side of the zipper to the other. One end is sewn in that other has hooks the eyes for these hooks are on the other side. So before I get zipper in I need to hook the elastic.
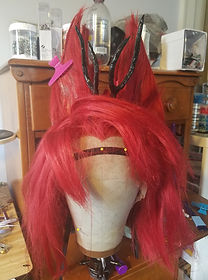
Wig


The base of the wig is a very long red wig, which I harvested fibers from(I am going to use the word fibers because they are technically not wefts as they are not sewn together), Because I ordered this off of Amazon I was worried about ordering just wefts from another company.
So I straightened the wefts with a very low straightener, sectioned off the bangs/ swoop and tied the rest into small bundles for storage and organization.
These I will reuse for the "ears" and the bang/ swoop section but first we need a base to attach the fibers to and an attachment place for the wig. (image) I cut the wig longer than I knew I needed because once the ears and bangs were set I took it to a friend to cut the left over hair the right length while I was wearing it.
The attachment of the ears takes place under the wig cap, under the wig there is a small worbla piece that is formed to my head. On top of that there is a little wire form that has three spikes that pop through the wig from inside to outside (image). This makes applying the wig more like a hat than a wig since with the worbla it no longer stretches.
I made a little paper template to make sure it was a good size, good shape and the curve was right. then I cut 4 "ear" shapes out of and glued just the edges to create a pocket for the wires to slide into.


I painted the foam red and black to match the "ear" pattern, this allowed me to use less fibers to cover them, or if a piece releases it is less noticeable (image) then I covered the foam with the harvested material using white glue ( I would probably use a different one if doing this again) leaving a space at the bottom of the ear to ease the fibers from the wig to the ear shapes. To tame the flyways I sprayed the whole thing with hairspray and used a blow dryer to set it.
The little horns are made of wire and foam clay that was attached to a piece of foam which is bolted through the wig, when you get to the bangs it will be easy to hide the attachment.


The horns are made out of wire with a thin layer of foam clay over them. The wire sticks out the bottom and goes through the EVA foam. I then fused and stabilized them with worbla. I took two bolts and encased them in worbla, punched a hole thought the foam and screwed the nut down. The worbla on the bolts was reheated and stuck to the worbla cap under the wig
This is looking down at the top of the wig before the ears were placed. The worbla cap is under the base of the wig so all you can see is the wig ear holders poking out from under the base. You can also see how the horns sit once the worbla covered bolts are installed
The horns and ears are installed I took some of the fibers that were still attached to the wig and brought them up to more seamlessly transition from head to ear. This is also before I applied the rat to keep the bangs fluffy

The ears are on, the horns are on, the rat was installed and the tips are painted. I back combed the lower most layer of fibers to give the rest of the wig more volume.
This is by no means set in stone you can always rework the wispy bits or the volume at the bottom. I am not even sure this is how my wig looks now after 4 years.
Hand
I created a hair rat with red webbing and poly fill, I will use that to sculpt the bangs around. I sewed the rat onto the cap and used the sectioned off hair to start covering the rat using the same hairspray, blow-drying process (image) I covered as much as I could then used the harvested fibers, covering the rat as much as I could. After the base of the wig is cut to the right length was do a very little teasing for fullness and we go on to the black tips. I want it to look more natural and not have such a hard differential line.
You have to be pretty delicate with this because using aerosol cans will create a breeze that will mess everything up, blowing the fibers back.
I had to adjust parts to fit my face and the style I was going for but I think it came out well.

I chose to make gloves because I wanted to be able to take the hands off without taking the whole glove off. So my gloves have a slit in the wrists.
I also decided to make the red tips of Alastor's hands nails instead of caps like most people do. This process was really straight forward I bought some fake nails, taped them to a board and sprayed them red. To apply I put on a latex glove under the black glove and used superglue to glue the nails on, that is all, this was probably the fastest part in this whole project.

Bowtie
The collar is pretty much like a regular shirt collar but by itself. Make the pattern for a standing collar based on your shirt (video). instead of sewing the bottom of the collar to the shirt sew it to itself. The collar needs a button hole in the back, this will button to your shirt and keep the collar down and two button holes in the center front these button to the shirt through the top button in the band collar.


You can try to make a one piece bowtie but, why. I cut 2 rectangles and one football shaped piece and sewed those together leaving a little section open to flip these pieces wrong side in.
I then took a strip of fabric, to make a tube. Once you get the seam where you want on one end, put a button hole ( this will be how you attach the bowtie to the shirt (through the collar). Sew the rectangle to the football shaped piece and fold those in half so it looks like a bow. Take that tube, which will be the knot, sew one end to the back of the bow and pull tight, wrap this around the bow and make sure the button hole is on the center of the back, sew this end down. This can be used for any bow, you will see me do this a lot on the Strawberry Shortcake build.
You could and this here but I wanted to add and you ball, I glued the glass eye to the knot and covered it with small piece of red fabric to hold it down I hand sewed it to the back and covered the rest of the eyelid fabric with Modge Pod to hold it all in place.
Staff
The main part of the mic was fun to brainstorm out with a props friend of mine. It is two pieces of pink insulation foam, before taping it together for the initial shaping and sanding, I cut a trench into the back of each foam piece ( ostensibly to create a hole in the middle of the mic body for the pole). All the details were added with Free Foam Sculpt. The eye that I used in the bowtie came as a pair so I used the other in the mic staff. I covered it with tape before placing it into the Free Form Sculpt.
While the curved shape around ALs microphone is really fun and makes it look like a vintage stage light I really want to make it look more like a vintage microphone (image) and while I have seen some really great versions with opaque (solid) materials I thought they looked a little heavy so I chose to use Plexiglass. When cutting plexiglass there are two things that will make it or break it (literally) 1) paper, keep the paper on as LONG A possible, if you have already taken it off or have had to for any reason you can use tape 2) go slowly when cutting. I cut 3 circles and the oval on the bandsaw leaving a place for the pole in the oval. After this I dremeled the edges to soften them. I was not going to go up in sand paper to get it mirror shine on a thin edge so it blends with the face, so I just applied a layer of clear nail polish. Do this to all the plexiglass pieces and once the polish is dry, find the center of the circles and drill a hole to accommodate the pole


Now you can figure out where the circle will sit on the PVC make that and drill a small hole through the PVC. This is important, this small hole will hold a small piece of wire or wood skewer. This is what the circles will rest on, you will still need to add clear Gorilla Glue but it takes some pressure off such a thin connection point. Before I put the mic body onto the staff I put 3 layers of wood glue on the pink foam to make it more durable (pink foam is VERY fragile) then painted the mic with acrylics and an air brush. I did go back after a competition and softened up the shadows and I just covered the halo with a shower cap… because it made me giggle. After the paint is dry we go on to assembling the top of the staff ( the mic part)
Cut some small skewers ( so they don’t poke though the face of the mic, gently and as straight as you can poke the skewers in from one side through the PVC to the other side. CAREFULLY take it apart and add a small amount of clear Gorilla glue to the hole and the plexiglass where the mic overlaps. Let that dry for 24 hours before moving.
Then I took all the tape and protective paper off everything and the staff was done.
FINAL THOUGHTS AND AWARDS
Overall look
Overall I really enjoyed this cosplay I think with the advent of the series coming out in 2024, I might put him back into rotation (the makeup is a pain but it gets easier every time)
Awards
Conneticon Masters Second Place 2017
Thy Geekdom Con Journyman Second Place 2020
Updates
(If there was anything I would change, I might make a bow, I do a LOT of versions of Merida and the bow might be easier to incorporate